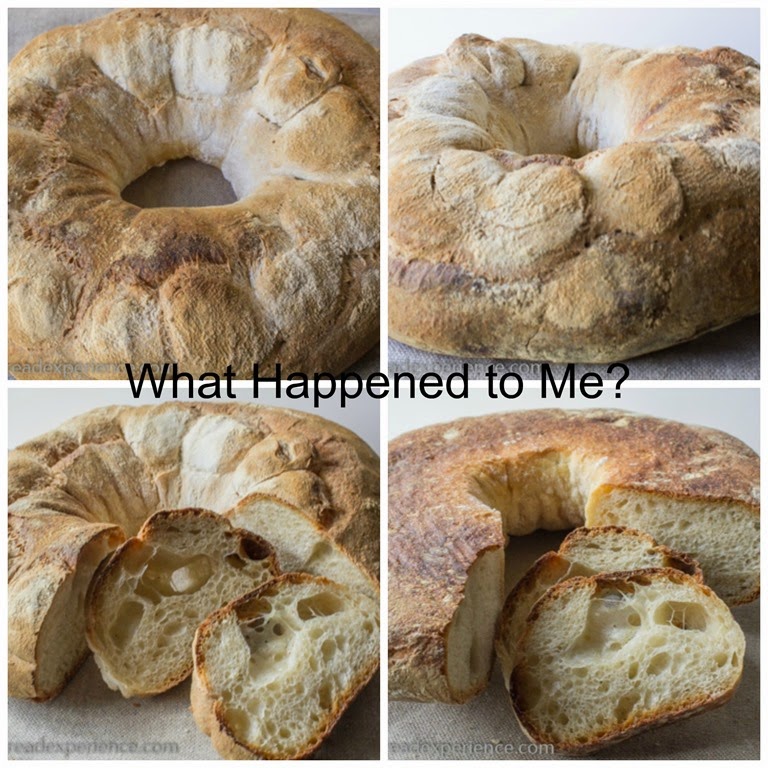
In this post, I outline the variables I tested to determine why my Couronne loaf was so pale. It turns out it was proofed too long.

A couple of weeks ago, I made a couronne with a mixed starter and old dough. A couronne is a French bread shaped like a crown.
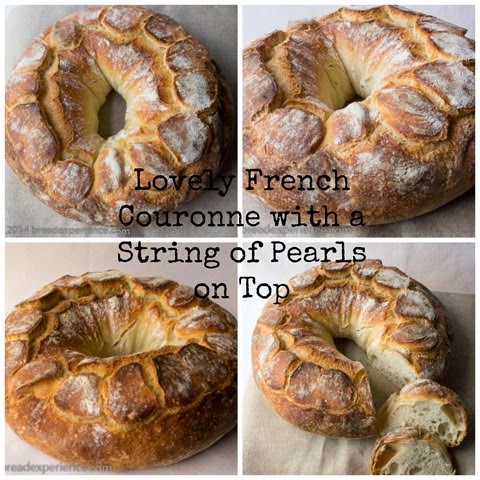
This particular bread crown has a string of pearls around the top which makes a very lovely decoration – if you get it right, that is.
A lot of the bakers in the Artisan Bread Bakers’ FB group were making this loaf so of course, I had to try it.
1st attempt at baking the couronne
Sadly, my first attempt resulted in a rather pale-looking loaf. I almost burnt it waiting for it to brown on top. See image above.
To figure out what went wrong, I worked through different scenarios that could potentially affect the outcome of a finished loaf.
Lots of factors go into the bread-baking process. That’s the fun of it, but it can also be frustrating when you’re not sure what happened. This is why it is always a good idea to keep notes when you are baking bread, especially a new one.
1st test: Did I forget the salt?
When I took the loaf out of the oven, I wondered if perhaps I had forgotten the salt, but I tasted it and it had salt in it. So I checked that off the list. The loaf rose nicely and the crust and the crumb were okay as well. So I was perplexed.
2nd test: Test/Calibrate the oven temperature
I moved on to a different scenario. Was something wrong with my oven? It’s an older oven so a friend of mine thought perhaps the oven temperature was off or maybe it needed to be calibrated. However, when I tested the temperature with an oven thermometer, it was the correct temperature. So that wasn’t the issue either.
My oven was the correct temperature so I didn’t have to calibrate it, but if your oven temperature and the thermometer don’t match, you might want to try calibrating it.
Articles on calibrating/adjusting the temperature gauge of an oven:
How do you calibrate an oven?
http://www.thekitchn.com/how-do-i-calibrate-my-oven-goo-111338
Adjusting the temperature gauge:
http://www.thekitchn.com/diy-oven-maintenance-adjusting-99850
3rd test: Did the baking stone get hot enough?
Since I had ruled out the salt and the oven temperature, I thought perhaps the baking stone hadn’t gotten hot enough or wasn’t providing even heat. The loaf did get somewhat brown on the bottom just not on top.
I hadn’t used this particular baking stone in a while so I thought perhaps that could be the problem. However, when I baked a different loaf on the baking stone, it turned out fine. So I ruled this option out as well.
4th test: Did I let the dough ferment too long?
I checked my notes to see what I had documented regarding the times and length of each proof.
I also reviewed the information on proofing loaves in Peter Reinhart’s Bread Baker’s Apprentice book. It was there I found the answer to my pale-loaf issue.
The problem was that I had allowed the dough to ferment too long. I knew that I had proofed it too long. I just didn’t know exactly how it would affect the finished loaf. Now I do.
I let it bulk ferment twice. The dough went through the normal fermentation process and then I moved on to the shaping phase. When I got to the pearl-shaping part, I had a hard time shaping the string because the dough was fairly slack. I wasn’t able to get them shaped correctly the first time so I rolled everything back together to start over again.
At that point, I probably should have just reshaped the crown and pearls, and baked the loaf hoping for the best, but I was tired, and I didn’t. I put the dough back in the bowl to rise again for another hour and at too high of a temperature.
I thought it was unusual the bread should be proofed at that high of a temperature. However, I was going back and forth between the printed recipe (in the kitchen) and a video of the process on my laptop (upstairs in my office), and I could have sworn the video said to proof it at the higher temp. Don’t ask me why I didn’t just bring my laptop in the kitchen to match up the printed recipe with the video. I was not with it that day.
Due to the extended fermentation, the dough was way overproofed. Sometimes when I proof dough too long, the loaf goes flat on me during the baking phase. However, this time I had also proofed it at too high of a temperature so it had a different outcome than what I had experienced before.
All of the sugars from the starch in the flour had been used up by the yeast so there were no sugars left to caramelize. According to Peter Reinhart, the “Maillard Reactions” (named after Dr. Maillard) should kick in during the latter stages of baking, however, they didn’t. No wonder the loaf looked so pale. This made perfect sense to me. Problem solved.
If you want more info on caramelization or the Maillard reaction, refer to this article.
2nd Attempt a few days later
Now that I finally knew what caused the loaf to turn out so pale, I decided to try the couronne again.
I changed two variables this time.
Due to my schedule, I let the dough cold ferment in the refrigerator overnight rather than proofing it at room temperature. This was the key – for me anyway. If you are going to let dough proof for longer periods to enhance the flavor, then you need to reduce the yeast and/or let it retard in the refrigerator overnight.
Letting it cold ferment also helped with the shaping process. It was much easier to shape the colder dough. So the pearls turned out much better.
I also decided to bake the bread using a different baking method. I thought it would be interesting to see the difference between baking it in a bread baker versus baking it on the baking stone using a steam pan. So for this experiment, I used a stoneware cloche.
The second attempt was the charm. It turned out to be an exceptional loaf. I was so thrilled.
Using stale bread: Even though the first loaf didn’t turn out as good as I would’ve liked, I didn’t waste it. I used it in a couple of dishes that call for stale bread. So what started as a “fail” turned into a “save.”
How do you go from a pale and sickly-looking loaf to a masterpiece using the same formula?
Read (or watch) the directions carefully, take good notes, and make sure all of your tools are in good working order.
What steps do you take when things go wrong with your bread?
Do you keep a notebook so you know what works and what doesn’t? Well, you should.
Happy Baking!
Cathy

Karen Kerr says
Love the bread science! Your second loaf is amazing!
Cathy W. says
Thanks Karen! I’m so glad I made this one again. It was worth the effort.
MyKitchenInHalfCups says
That is such fabulous science and experimentation!
So, for the purpose of argument or just more experimentation, what if in the process of making bread you were to say to yourself “oops, I’ve over proofed this one, what could we do to possibly save it and get something of color in the crust? A little sugar and butter? sugar & water? I know even with the best of intentions.
Cathy W. says
Great question Tanna! You could do an egg wash on the crust to provide more color. And make sure it gets enough steam which is what the La Cloche provided.
MyKitchenInHalfCups says
Of course!