Crisp and light with a hint of wheatiness is how I would describe this sprouted wheat pizza dough.

If you want an easy wholewheat pizza dough with exceptional flavor, this one fits the bill. The pizza can be mixed and baked on the same day or you can retard the dough in the refrigerator overnight and bake the pizza the next day.
I was looking for a creative way to use some of the sprouted flour I bought recently and this pizza dough provided the perfect canvas for that creativity.
I got the idea for making sprouted wheat pizza from Bread Revolution by Peter Reinhart. I substituted sprouted KAMUT and spelt flour and adjusted the hydration level.
This dough does not require a long fermentation nor does it require an overnight rest in the refrigerator; however, I found it worked better with my schedule to let the dough balls rest in the refrigerator overnight. One dough ball rested in the refrigerator for three days.
I’ve made three pizzas so far with the dough. My three attempts are outlined below. This dough makes a total of five pizza balls. I put the other two pizza balls in the freezer to enjoy another day.
1st pizza: I-Heart Pizza
Due to a mishap with getting the shaped pizza dough off of the peel and onto the pizza stone, the first pizza ended up in the shape of a heart (sort of). I’ll have to try it on purpose sometime and see if I can get a really good heart shape. This one tasted good, but I had turned the oven down too soon so it wasn’t quite as crispy as I wanted.
I showed a photo of this pizza on FB and a friend asked if it was made with sourdough. That’s the thing about using sprouted wheat. You can get these results using yeast. Of course, you can use sourdough if you prefer but I wanted to try it with yeast to see the results. I’m sold.
2nd Pizza: Thin & Crunchy
The second time I made pizza, I rolled out the dough using a rolling pin to get it thinner, but I rolled it out a bit too thin. It got burnt around the edges, but the flavor was nice.
I took the photo below in my kitchen (where the lighting is terrible) so that’s why it looks yellowy.
As I was making these pizzas, I documented my results in an email to a friend. When he saw this photo, he asked me what I was going to do with the pizza bones. I hadn’t heard that term before, but I like it. They were a bit too crispy for my enjoyment so I let Charlie (my beautiful blue-eyed dog) enjoy the pizza bones. He thanked me.
3rd Pizza: The Charm
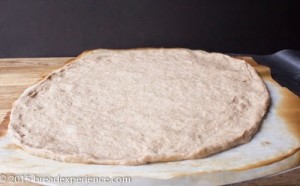
As they say, the third time is the charm and it certainly was. I shaped this dough using the back of my hands to support the dough and stretching the dough with my thumbs and gravity (as the instructions say to do). I placed it on parchment paper rather than trying to pry it off of the pizza peel. I got a new pizza peel and I still need more practice with it.
I’m extremely pleased with the way the third pizza turned out. It ended up fairly round and had a rim around the edges that puffed up very nicely when baked. I enjoyed this one the most. I thought I had overloaded it with too many toppings, but it held together well and tasted great. My friend had commented that the third pizza looked rather barren so I added more toppings to this one.

“The Charm” Sprouted Wheat Pizza Dough
Adapted from: Bread Revolution by Peter Reinhart
Makes: Five 8-9 oz. Pizzas
Ingredients:
- 380 grams sprouted KAMUT flour
- 300 grams sprouted spelt flour
- 14 grams salt
- 5 grams instant yeast
- 560 grams water, room temperature
- 2 tablespoons olive oil
Mix the Dough:
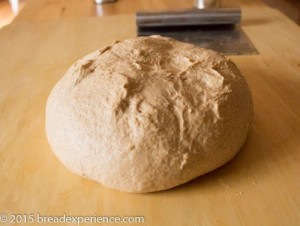
Whisk together the flours, salt, and yeast in the bowl of a stand mixer. Pour in the olive oil and gradually add in the water (withhold about 50 grams and add it in gradually) then mix with the paddle attachment for a minute or so until the flour is completely hydrated. The dough will be coarse and wet at this point.
Let the dough rest uncovered for about 5 minutes. Switch to the dough hook and mix, on medium-low speed, for a minute. The dough should start to smooth out and thicken a bit.
Fold and Stretch the Dough
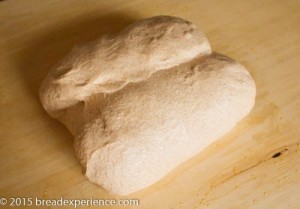
Using an oiled rubber spatula or dough scraper, remove the dough to a lightly oiled work surface. Using oiled or wet hands, stretch and fold the dough. To perform a stretch and fold, fold the dough over itself four times from the left, right, top, and bottom (see photo #2 below). The dough will firm up but it will still be soft and sticky.
Let the dough rest on the counter covered with a mixing bowl or place it in the bowl and cover the bowl with plastic wrap or a kitchen towel. At intervals of 5-20 minutes, perform three additional stretch and folds. Wet or oil your hands for each fold-and-stretch to keep the dough from sticking to your hands. It will become firmer with each stretch and fold. I found that doing the folds every 20 minutes gave the dough more strength.
After the final fold, the dough will be tacky, yet supple and it should have a bouncy quality.
Note about fermenting the dough overnight: If you prefer to let the dough ferment overnight, put it in the refrigerator after the final fold.
Bulk Fermentation
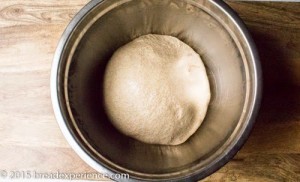
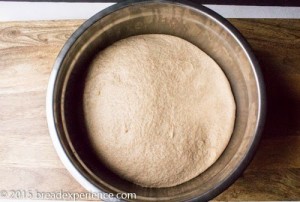
Oil a large bowl and place the dough in it. Turn the dough to coat it in oil. Cover the bowl with plastic wrap or a kitchen towel. Let the dough rise at room temperature for 1 1/2 to 2 hours, or until doubled in bulk. If you prefer a shorter proof, put the dough in a warm place (90 degrees F.) until doubled in bulk.
Shape Dough Balls and Final Proof
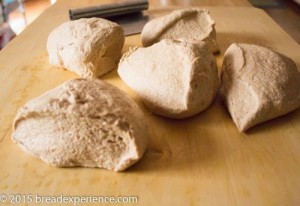
Line a sheet pan with parchment paper and lightly spray or coat it with olive oil. Using an oiled dough scraper or rubber spatula, transfer the dough to a lightly oil work surface. Using a metal pastry blade or plastic bowl scraper, divide the dough into five equal pieces. Mine weighed about 8.5 ounces each.
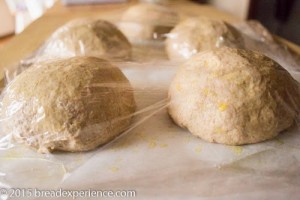
Form each piece into a round ball (boule). Place the dough balls on the prepared pan and space them evenly so they have room to rise slightly. Mist the tops with olive or vegetable oil and cover loosely with plastic wrap, or place in a food-grade plastic bag. Proof the pizza balls for 1 to 2 hours. They won’t double in size but should expand.
Note about retarding in the refrigerator: At this point, you can continue to baking the pizzas or place them in the refrigerator overnight. Remove them from the refrigerator about 1 1/2 hours before you plan to bake the pizzas.
This is what I did. I placed the pizza balls in the refrigerator and baked one pizza each evening for three consecutive days for a total of three pizzas.
Preheat Oven
This pizza performs best when baked at a high temperature.
Preheat the oven as high as it will go with a baking stone (if using) on the bottom rack. The dial on my oven goes to 550 degrees F., but the thermometer (in the oven) reached 600 degrees F. when it was fully preheated. The first time I made the pizza, I freaked and turned the oven down. For “The Charm” pizza, I didn’t turn the oven down. I let it bake at 600 degrees F. (according to the thermometer).
Shape the pizzas
Press the ball of dough into a flat disk using your fingertips. Slide the backs of your hands under the dough and as you rotate it, use your thumbs to coax the dough into a larger circle. Try not to use the backs of your hands or your knuckles to stretch it or you might tear the dough. Gravity will help stretch it. Do this from the outside edges of the dough, not the center. If you and/or the dough get tired or the dough snaps back, just lay it down on the floured work surface and let it rest. Move to shaping another pizza or just take a deep breath.
Continue stretching the dough until you have a 9-to 12-inch disk. Place the disk on a floured or parchment-lined baking peel. You can also use the back of a baking sheet if you don’t have a peel. It’s best to use flour on the peel because it doesn’t burn as quickly as cornmeal and semolina.
If there are any holes in the dough, patch them before adding the sauce or toppings. Otherwise, you’ll end up with a gooey mess.
Top and Bake the Pizzas
Add the toppings of your choice. I used marina sauce, onions, green peppers, turkey pepperoni, and three different types of cheese: mozzarella, shaved parmesan, and feta cheese.
Slide the pizza onto the preheated baking stone, if using, or place the pizza on the baking sheet directly in the oven. Bake the pizza for about 4 minutes, then rotate the pizza using the pizza peel. It will take anywhere from 5 to 7 minutes for the pizza to bake fully. The edge should puff up and the color will be a deep golden brown or darker depending on the type of flour used and if you let it get charred.
 |
 |
 |
 |
 |
 |
 |
 |
 |
 |
Remove the pizza, then let it cool for 1 minute before slicing and serving. Continue baking as many pizzas as desired.
This dough will last in the refrigerator for up to three days. I know because I tested it and the dough ball from the third day was my favorite. You can also freeze the pizza balls for up the three months.
Happy Baking!
Cathy


Leave a Reply